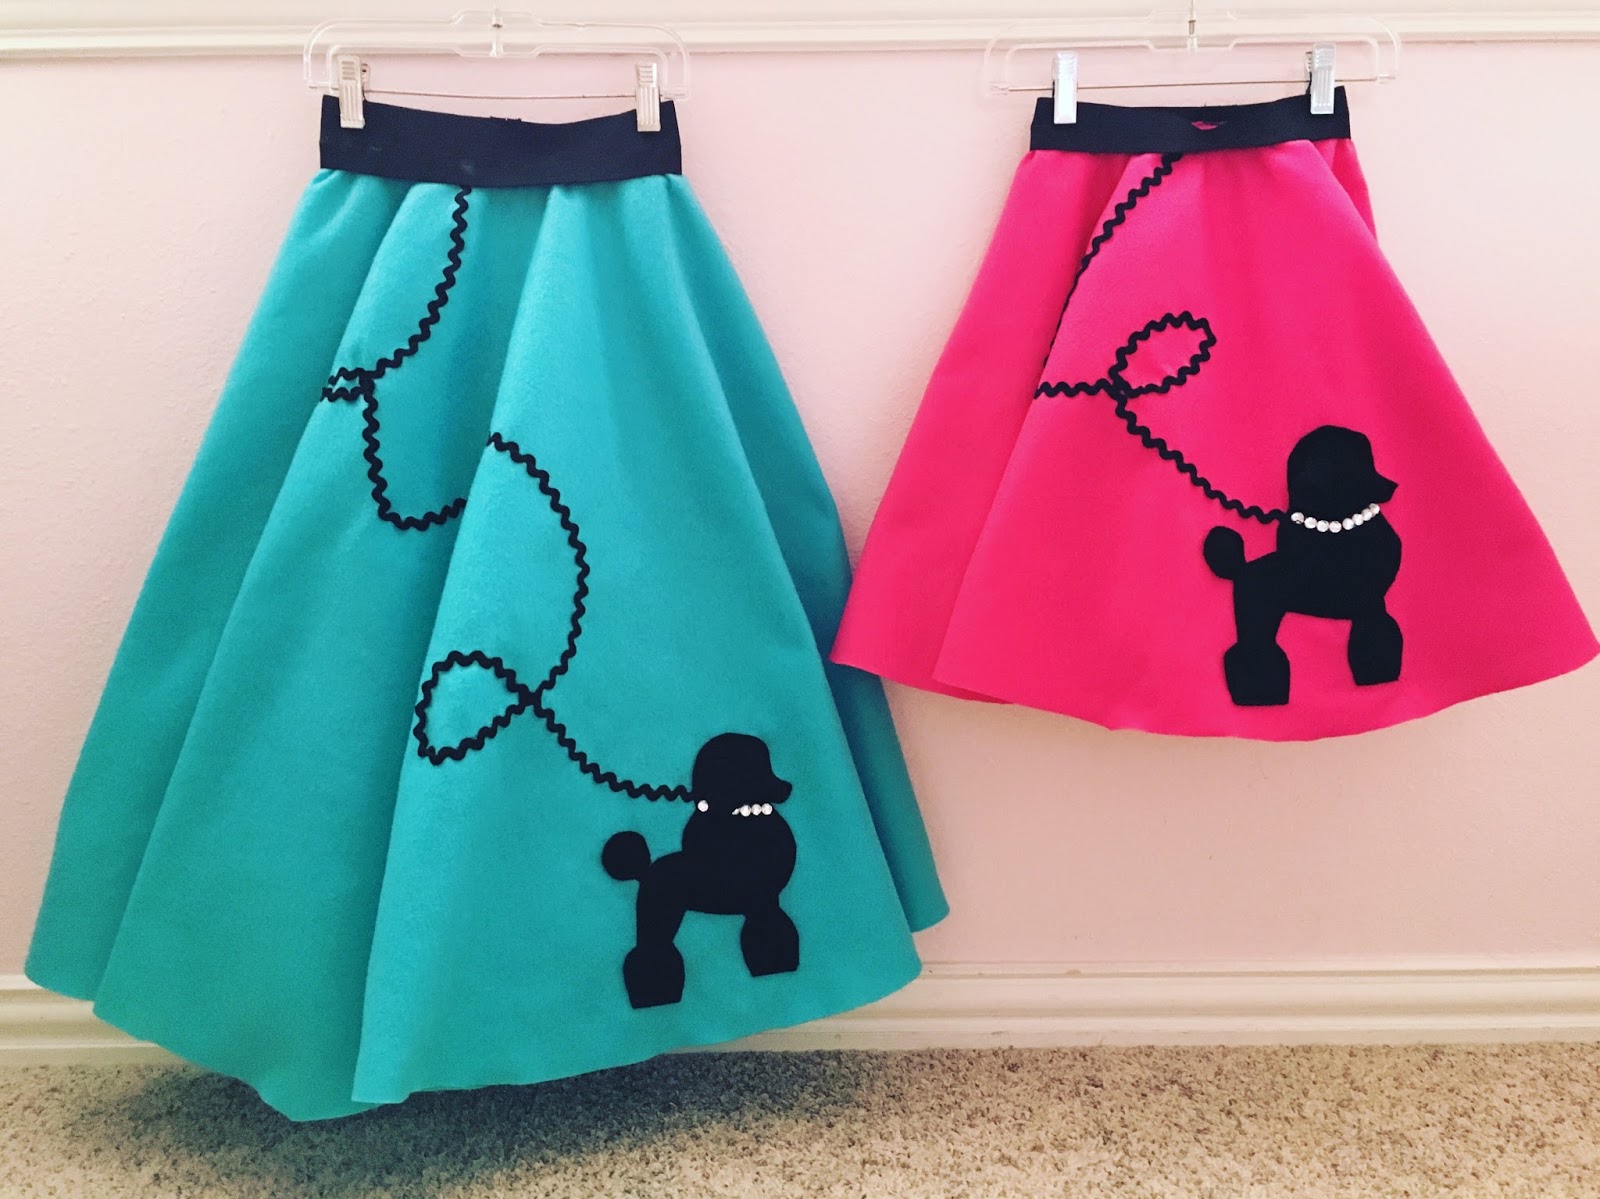
My mom made me a poodle skirt when I was in middle school. I remember feeling so proud that she took the time to sew it for me. I loved that skirt.
So when a friend invited my girls to her party and mentioned that they "could" wear a poodle skirt, if they had one---well I knew it was time to continue the poodle skirt tradition.
Showing posts with label sewing. Show all posts
3/28/16
6/11/14
"T-Shirt into a Dress" {the Frozen Edition}
If you have a little girl, you know the popularity of the movie "Frozen". I feel like that ballad "Let it Go" has become the official theme song for 2014. Seriously, I can't get that song out of my head. If you have tried to purchase anything 'Frozen-related' in the past few months, you know it is virtually impossible. Disney must have all that Frozen merchandise locked up in their movie vault!
So when I found out my sweet little niece is a huge 'Olaf' fan, I wanted to buy her something cute and Olaf-y from the Disney store for her birthday. Buuuuuuut no such luck. I think the manager at the Disney store actually laughed when I told her what I was looking for.
I bought the only 'Olaf' tshirt I could find and decided to turn it into a cute dress. If Disney wouldn't sell me a fun knit Frozen dress, I would just have to make it myself :)
Want to turn an oversized t-shirt into a dress like I did? Here's what you will need.
-Large t-shirt (this is a size 7/8 and I made it into a 2/3t dress)
-Ribbon
-Ruffle
-Elastic
-Sewing machine
-Sewing scissors
Step 1: Cut off the sleeves, just inside the the seam. I used my rotary cutter on a mat, but you can use scissors. Since knit doesn't fray you can leave it as is after cutting- yay!

Like this post? Join the thousands of other readers that have subscribed to Crafty Texas Girls.
Click below to get your free subscription delivered directly to your inbox.
Subscribe to crafty texas girls
Keep in Touch with Crafty Texas Girls
Facebook | Instagram | Pinterest | Twitter | Blog
Follow my blog with Bloglovin
All photos and text on craftytexasgirls.com are copyright protected. You may not copy entire articles or posts (even with a link) without my express written permission. Email any requests or links used to craftytexasgirls@gmail.com.
So when I found out my sweet little niece is a huge 'Olaf' fan, I wanted to buy her something cute and Olaf-y from the Disney store for her birthday. Buuuuuuut no such luck. I think the manager at the Disney store actually laughed when I told her what I was looking for.
I bought the only 'Olaf' tshirt I could find and decided to turn it into a cute dress. If Disney wouldn't sell me a fun knit Frozen dress, I would just have to make it myself :)
Want to turn an oversized t-shirt into a dress like I did? Here's what you will need.
-Large t-shirt (this is a size 7/8 and I made it into a 2/3t dress)
-Ribbon
-Ruffle
-Elastic
-Sewing machine
-Sewing scissors
Step 1: Cut off the sleeves, just inside the the seam. I used my rotary cutter on a mat, but you can use scissors. Since knit doesn't fray you can leave it as is after cutting- yay!
2. Cut off the top of your shirt. I cut just above the collar. The bit of collar left won't show, so don't worry about it.
3. Fold down the front of the shirt and pin both sides in about 3/4".
4. Sew a straight stitch to create 'tube' or casing for your elastic. I used hot pink thread to match the ruffle that I will add at the end.
5. Now thread through your elastic. My elastic is less than .5 inch wide and 16 inches long. This will form the neck of the dress. (You want it big enough to pull over her head, but not so big that the dress falls off her shoulders.) Run the elastic through both the front and back of the dress, then overlap the ends of the elastic and sew together.
6. Overlap the shirt to cover the elastic and sew closed on top of BOTH shoulders.
7. Now you can add a ribbon and be done! I didn't sew on my ribbon because I wanted her mom to be able to remove it for washing or if it annoyed my niece. Some kids like a bow on the shoulder, some don't :) This chevron ribbon is from Hobby Lobby.
8. Optional-- add a ruffle! You can buy premade ruffle or make your own. I cut off a strip of hot pink knit from a Hobby Lobby XL tshirt. Then I ran it through my machine to create a ruffle. (See how I like to make a ruffle by clicking here.)
9. Sew on the ruffle. Then 'top stitch' to keep the ruffle from flipping up (and it adds a little design detail). The contrast stitching at the neck matches the stitching I did at the bottom.
And there you have it! A plain t-shirt transformed into a cute dress. This tutorial is perfect for all those boxy shirts you have stuffed in drawers. Just in time for summer camp and VBS shirts too!
Credit for this AWESOME idea-- goes to the talented +CampClem see her post {here},
she has a super tutorial that I used to make my dress!
Any questions- leave a comment below.
Happy Birthday to my little niece, I like warm hugs too :)

Like this post? Join the thousands of other readers that have subscribed to Crafty Texas Girls.
Click below to get your free subscription delivered directly to your inbox.
Subscribe to crafty texas girls
Keep in Touch with Crafty Texas Girls
Facebook | Instagram | Pinterest | Twitter | Blog
Follow my blog with Bloglovin
All photos and text on craftytexasgirls.com are copyright protected. You may not copy entire articles or posts (even with a link) without my express written permission. Email any requests or links used to craftytexasgirls@gmail.com.
Labels:
Craft Tutorial,
sewing
3/19/14
Lace Patch for Jeans (DIY)
I really like distressed jeans. My Dad always teases me and asks "Can't you afford pants that don't have holes in them?!" But the truth is, I like to buy them with a few holes :)
With distressed jeans comes great responsibility. Holes are the knees are good:) Holes on the crotch or behind are not good :(
My very favorite pair of distressed jeans had a great 'frayed' piece on my thigh. But after lots of washing, that became a hole. The hole was high up on my thigh and it made me feel a little exposed! So instead of getting rid of a perfectly great pair of jeans, I decided to patch them. When I think of patched jeans, I conjure up an image of a big rainbow or smiley face patch, you know, something a child of the 80's would proudly wear on the knees of their corduroy pants.
But the 80's are gone. So I decided to make my own patch, a more modern version :) I placed a piece of ivory lace over a denim patch (you can find denim patches at a craft store or even in the sewing department at Walmart). The lace is from my stash-- it came on a roll in the ribbon section at Hobby Lobby.
Instead of layering the patch on the top of my jeans, I placed it on the inside of my pants. This way, the lace and denim show through the hole. (Important: Don't just use lace! You need the denim patch behind it, otherwise your skin will show through!)
I used my sewing machine to straight stitch around the hole with white thread. I made sure the stitch went through both the lace, the patch, and the pants. Make sure everything is held in place so it will hold up to the washing machine.
And voila! My distressed jeans will live to see another day. This tutorial would be great for adults or kids. Think how cute a pair of little girl jeans would look with lace patches on the knees? The lace adds a vintage touch- don't you agree?
Are you a fan of distressed jeans? How many holes is too many?

Like this post? Join the thousands of other readers that have subscribed to Crafty Texas Girls.
Click below to get your free subscription delivered directly to your inbox.
Subscribe to crafty texas girls
Keep in Touch with Crafty Texas Girls
Facebook | Instagram | Pinterest | Twitter | Blog
Follow my blog with Bloglovin
All photos and text on craftytexasgirls.com are copyright protected. You may not copy entire articles or posts (even with a link) without my express written permission. Email any requests or links used to craftytexasgirls@gmail.com.
With distressed jeans comes great responsibility. Holes are the knees are good:) Holes on the crotch or behind are not good :(
![]() |
| This is another pair of jeans in my 'distressed denim' collection. And....maybe this pair is ready for retirement. With holey jeans- you gotta know 'when to say when'! |
Instead of layering the patch on the top of my jeans, I placed it on the inside of my pants. This way, the lace and denim show through the hole. (Important: Don't just use lace! You need the denim patch behind it, otherwise your skin will show through!)
| Here is the hole after I patched it. I cut down the patch and lace to fit. It still leaves the jeans looking distressed, without the 'peep show' of my thigh! |
And voila! My distressed jeans will live to see another day. This tutorial would be great for adults or kids. Think how cute a pair of little girl jeans would look with lace patches on the knees? The lace adds a vintage touch- don't you agree?
Are you a fan of distressed jeans? How many holes is too many?

Like this post? Join the thousands of other readers that have subscribed to Crafty Texas Girls.
Click below to get your free subscription delivered directly to your inbox.
Subscribe to crafty texas girls
Keep in Touch with Crafty Texas Girls
Facebook | Instagram | Pinterest | Twitter | Blog
Follow my blog with Bloglovin
All photos and text on craftytexasgirls.com are copyright protected. You may not copy entire articles or posts (even with a link) without my express written permission. Email any requests or links used to craftytexasgirls@gmail.com.
Labels:
Craft Tutorial,
sewing
12/2/13
Sew It: DIY Aztec Knit Skirt
Guest Post: Today I am welcoming my small business friend Samantha Howard of "bobaloo! cool stuff for modern tots". She is sharing how to easily make an aztec knit skirt- perfect for layering over leggings. A big thanks to Samantha Howard for taking time away from her shop to share this awesome tutorial with us!
------------------------------------
As a work-at-home mom, I pretty much live in leggings and boots this time of year. However, I am a firm believer in Tim Gunn's "leggings are not pants" rule. I don't have a ton of shirts that cover my business so I was kind of stuck with the same two long cardigans. Then, when making a big ol' batch of these blankets, the stack of scrap yardage sparked an idea - little skirts to cover my booty AND let me wear my beloved leggings even with my regular shirts!
After I posted an Instagram pic, Samantha asked me to show you all how to make your own. Here you go!
What you need:
- about 1/2 yard knit fabric (stretchy, t-shirt-weight jersey knits work best)
- 1 yard waistband elastic, 1" - 1 1/2" wide (you'll need a little more if your waist measurement is larger than 36" inches)
- A big safety pin
- Sewing machine with a ball point needle (you can use a regular needle if you want, but a ballpoint needle is made for knits and makes for nicer-looking stitches)
- Pins
- Tape measure or string & ruler
2. Now for a tiny bit of math! I'll use my measurements for an example. For reference, I'm 5' 7" and typically wear a size 12 or 14 in pants.
So here's what we do:
- Divide your hip measurement in 2 (for me, that's 44" divided by 2, which yields 22")
- Subtract 1" from your result (for me, 22" - 1" equals 21")
There's your panel width! Subtracting the inch yields something called "negative ease", which is a fitting term. Basically, taking that bit off ensures that the stretchy knit fabric will lay close to your body.
- Add 2" to your skirt length measurement (for me, 14" + 2" equals 16")
That's it! This measurement is if you leave your skirt un-hemmed, which is what I do. Knits typically don't unravel, and well... I'm lazy.
3. Using those measurements, we'll cut two identical panels. My panels measure 21" wide by 16" tall (you'll want the stretch to go width-wise). I use two layers of fabric and cut mine at the same time so they're exactly alike. I should probably considering ironing the fabric before cutting.
4. Stack your panels on top of each other, right sides together. Pin down each side. Using a small-to-medium stitch length (I set my Janome machine on 3), sew the two short sides using a 1/2" seam allowance, removing the pins as you go. Don't forget to backstitch a few stitches at the beginning and end of each seam to secure the threads!
6. Next we'll make a casing for the elastic. This is basically a "tunnel" for the elastic. Press the top of your skirt down 2" and pin in place.
7. If you are able to on your machine, set your stitch to a long, narrow zigzag. I'm just using a straight stitch for this one, and in my experience it's worked just fine, so feel free to leave your stitch setting alone if you'd like. Starting about 1" from the side seam, stitch about 1/4" from the raw, turned-under edge. Stop 1" from the side seam you began sewing at to leave a 2" opening in the casing.
8. Set your skirt aside and grab your elastic. Wrap it around your waist where you'd like to wear the skirt, and pull it until it's just a little snug, not tight. Overlap the ends by 1" and cut the elastic.
Insert a large safety pin in one end of the elastic and close it. Use the safety pin to feed the elastic through the casing, making sure not to twist it or let the loose end slide into the casing.
What you need:
- about 1/2 yard knit fabric (stretchy, t-shirt-weight jersey knits work best)
- 1 yard waistband elastic, 1" - 1 1/2" wide (you'll need a little more if your waist measurement is larger than 36" inches)
- A big safety pin
- Sewing machine with a ball point needle (you can use a regular needle if you want, but a ballpoint needle is made for knits and makes for nicer-looking stitches)
- Pins
- Tape measure or string & ruler
- A rotary cutter and mat or ruler and scissors
If you've never sewn with knits on a regular machine, this post has some great tips. This is a simple project and easy to sew up on a regular machine.
1. First, we're going to take some measurements. Measure your hips at the widest point. The easiest way to do this is with a tape measure, but if you don't have one you can use a piece of string to wrap around your hips, then measure the string with a ruler. We'll call this measurement "hip".
If you've never sewn with knits on a regular machine, this post has some great tips. This is a simple project and easy to sew up on a regular machine.
1. First, we're going to take some measurements. Measure your hips at the widest point. The easiest way to do this is with a tape measure, but if you don't have one you can use a piece of string to wrap around your hips, then measure the string with a ruler. We'll call this measurement "hip".
Next, determine your length. Using your tape measure or string, measure from your waist (where you'll wear the skirt - for me just below my bellybutton) to your desired skirt length. We'll call this measurement "skirt length".
So here's what we do:
- Divide your hip measurement in 2 (for me, that's 44" divided by 2, which yields 22")
- Subtract 1" from your result (for me, 22" - 1" equals 21")
There's your panel width! Subtracting the inch yields something called "negative ease", which is a fitting term. Basically, taking that bit off ensures that the stretchy knit fabric will lay close to your body.
If you'd prefer a looser-fitting skirt or have a knit without much stretch, you can use the hip-divided-by-2 measurement.
Next up, our panel lengths:- Add 2" to your skirt length measurement (for me, 14" + 2" equals 16")
That's it! This measurement is if you leave your skirt un-hemmed, which is what I do. Knits typically don't unravel, and well... I'm lazy.
4. Stack your panels on top of each other, right sides together. Pin down each side. Using a small-to-medium stitch length (I set my Janome machine on 3), sew the two short sides using a 1/2" seam allowance, removing the pins as you go. Don't forget to backstitch a few stitches at the beginning and end of each seam to secure the threads!
5. Press your seams open if you'd like. Go ahead and slip your skirt on now, and pay attention to how it fits across your hips. If it's too big, trim down one side and re-sew. It's going to be big in your waist, but we'll fix that with the elastic.
7. If you are able to on your machine, set your stitch to a long, narrow zigzag. I'm just using a straight stitch for this one, and in my experience it's worked just fine, so feel free to leave your stitch setting alone if you'd like. Starting about 1" from the side seam, stitch about 1/4" from the raw, turned-under edge. Stop 1" from the side seam you began sewing at to leave a 2" opening in the casing.
8. Set your skirt aside and grab your elastic. Wrap it around your waist where you'd like to wear the skirt, and pull it until it's just a little snug, not tight. Overlap the ends by 1" and cut the elastic.
Insert a large safety pin in one end of the elastic and close it. Use the safety pin to feed the elastic through the casing, making sure not to twist it or let the loose end slide into the casing.
9. Once you've got it all the way through, double check that it's not twisted, then overlap the ends by 1". Stitch them together in a square to secure the ends together, and adjust the skirt so it's evenly distributed along the elastic. Sew the casing closed 1/4" from the raw edge.
Look at you and your new skirt! Now go gather up some knit scraps and make a few more!
Ready for extra credit? Here are some ideas!
- Add a hem to the bottom of your skirt by adding an extra 1 1/2" to your skirt panel length. After you sew the side seams, turn your hem up 1 1/2", press, and stitch 1/4" from the raw edge. This is especially useful for sweater knits, which may unravel.
- Repurpose an old shirt! If you've got a knit shirt that is wide enough to go across your hips, just cut it off in a straight line below the armpits and add the elastic casing and elastic!
- A stretch lace skirt would be ADORABLE and so easy to dress up for a holiday party! You can usually find lace by the yard in fabric stores in the special occasion aisle. You can sometimes find it near the ribbon, too.
---------------------------------------------
Samantha Howard is the owner and designer of bobaloo! cool stuff for modern tots.
Shop online at bobalookids.com for Christmas, baby showers, birthdays and more.
Browse pocket bibs, burp cloths, teething rings, pacifier clips, crayon aprons, stuffed toys, blankets, and tooth fairy pillows with a modern twist by clicking here.

![]() |
| Crayon Aprons by bobaloo! $19 |
![]() |
| Tooth Fairy Pillow in Chevron $14 |
![]() |
| {Gift Set}- Pocket Bib and Burb Cloth $18 |
![]() |
| Big Softie Blanket $49 |

Like this post?
Subscribe to crafty texas girls
Keep in Touch with Crafty Texas Girls
Facebook | Instagram | Pinterest | Twitter | Blog | Shop
All photos and text on craftytexasgirls.com are copyright protected. You may not copy entire articles or posts (even with a link) without my express written permission. Email any requests or links used to craftytexasgirls@gmail.com.
Labels:
Craft Tutorial,
sewing
Subscribe to:
Posts (Atom)


.jpg)
.jpg)
.jpg)
.jpg)
.jpg)

.jpg)
.jpg)
.jpg)
.jpg)
.jpg)
.jpg.jpg)
.jpg)
.jpg)
.jpg)
.jpg)
.jpg)
.jpg)